Pretty much every summer I take a short blog break, and this is no different. Need some thinking time!
I'll be back on the blog later in August with more ReDesign on a Dime, Sunday Savings, etc. See you then, and thanks for all the comments lately. I read, enjoy, and listen to every one.

Wednesday, July 30, 2014
Tuesday, July 29, 2014
Simple and Soft

This came out exactly as I imagined, and I like what I imagined. Now that doesn't happen very often!
While it looks like a one layer card, it is actually 4 pieces: (1) an A2 white card, (2) the portion above the die cut flowers, (3) the die cut flowers, and (4) the portion below the flowers.

Because I wanted a deep indentation, I pulled out a piece of #110 lb white cardstock by Recollections, rather than the 80 lb Neenah that I often use. Worked like a charm.
Die by Memory Box. Colored with Copics. Glue by an international conglomerate, sucking the money out of our pockets.
MOOD WHEN DONE = Serene
Monday, July 28, 2014
Oh Hi and Keeping the Eye Moving in One Direction
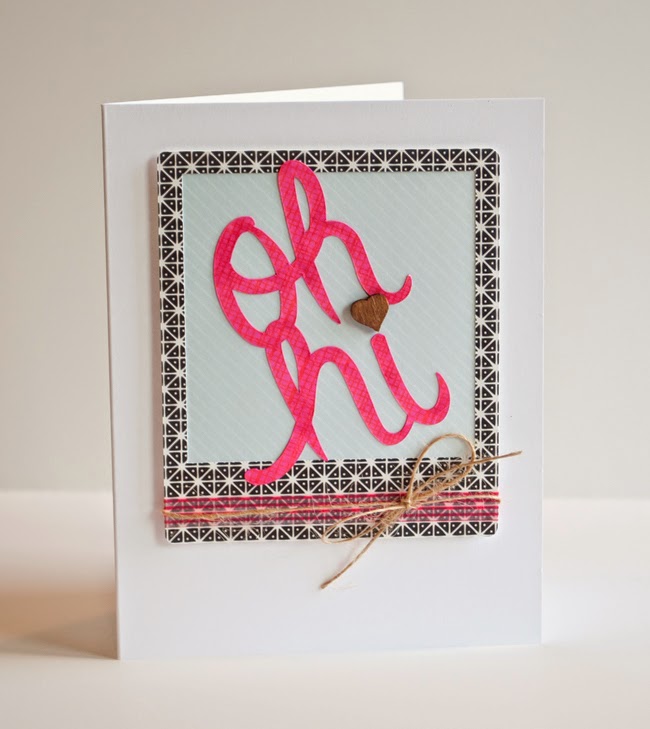

When I seea card that I like, I try and do a very quick analysis of why I like it. One of the things I look for is whether my eye has a place to go. Does the design move my eye in one direction? Here, I aimed for a top left to bottom right direction.
How I Made This Card:
1. Cut the phrase Oh Hi on yellow patterned paper using my Silhouette, making sure it would be a bit larger than the opening in the frame.
2. Cut the frame with the black patterned paper also using the Silhouette.
3. Enlarged the frame a bit and cut again, this time with the blue striped paper so that the center piece would be large enough to adhere to the back of the frame.
4. The yellow patterned paper didn't work, so I colored it with a neon pink Copic marker.
5. Decided that the card needed another pop of bright pink. Apparently washi tape can be used on a card.
6. Wanted some beige color to tone down the card and added the wooden heart and twine. Bow tied on the right to keep the eye moving from top left to bottom right.
7. Adhered it all, making sure that the stripes on the paper went from top left to bottom right. The entire panel is popped up with teeny tiny dimensionals.
MOOD WHEN DONE = Always grateful to be able to stamp. It really is a luxury to have time for a hobby.
Thursday, July 24, 2014
Congrats Is Not a Word
But ....


I gulped and used the stamp anyway (from Label Love by Altenew). I love the crisp lines of the sentiment with the soft curves of the background.
How I Made the Card:
1. Making the background was fun -- and easy. Using cream card stock (Recollections from Michaels), stamped an Impression Obsession background with Versamark and embossed with clear embossing powder (more on that stuff on Sunday...).
2. Sponged Peacock Feathers Distress Ink and set aside.
3. Stamped the sentiment and embossed in clear. Cut.
4. Decided the background needed a bit of the purple ink so I swiped it over parts of the background.
5. Adhered as shown (sentiment popped up).
MOOD WHEN DONE = Celebratory
Tuesday, July 22, 2014
Watercolored Hello

Used this flower from Savvy and the Hello is part of a sentiment in Hero Arts Dauber Bunch. Cut the sentiment. It's easy and no one cried.
Here's the beginning of the project:

Since the stamp is wood mounted, used a stamp positioner to place the flowers around the sentiment. That's an old wood cutting board I use for water coloring and embossing. As I painted the flower, I placed the board outside in the sun for a few minutes to speed dry the layers. On a hot sunny summer day, the paper dries out so quickly.
Die cut those little green things. Hmmm.
Used additional markers to add some shading. Matted and adhered to a very lime A Muse Studio card. Yum.
MOOD WHEN DONE = Cheerful
Tuesday, July 15, 2014
Well, This Was Fun

Love stamping on a small space and getting the shape, the color ,and the sentiment to work together.
Stamps: Clear and Simple Stamps Writer's Desk and Lawn Fawn Harold's ABCs.
Butterfly cut with the Silhouette and colored with a Copic rainbow. Cut a bunch of these butterflies, so they may be popping up now and then.
MOOD WHEN DONE: SUNNY
Sunday, July 13, 2014
Sunday Savings: Mind Games

New stamp companies and designs are everywhere, and they are more fun, more clever, more everything, than 10 years ago. And stampers are using these new designs in amazing, fun, beautiful ways.
And dies!! If I got every die I want my craft room would look like this:

No sooner does one amazing thing hit the street that the next amazing thing comes along. It's not a once a year catalogue, or even a once a month release anymore. Every day, every single day, there's something fabulous.
And the something fabulous becomes a line of something fabulous. Love Ranger Distress inks? I do. But now there's Distress paints, stains, reinkers, crackle paint, stickles, watercolor paper, card stock, and markers. And mini distress inks. And a blender. And a mini blender. And a tin to hold the mini inks.

It's just a question of time before Tim Holtz markets Distress Tears. Color away your sadness....

(photo from Deviant Art by Count-L)
And, despite being committed to spending small and spending smart, sometimes I make choices I regret.

The fact is that, deep down, no matter the downsizing, there are moments when I sort of still want it all. So, to avoid this:

and this:

I play a little mind game. It goes something like this.
If there were 3 new stamp sets a year, and I could only have 2 I'd feel deprived, like I was missing out. But there are 30,000 and I like at least half of them. Since even I don't want 15,000 new stamp sets, I concede that I must do without a lot of stuff I love. If I can do without that cute new Mama Elephant set today, I can do without it tomorrow.
It works.
Most of the time.
Wednesday, July 9, 2014
White Flowers (and a Pinterest/Blogger Tip)

Used Ranger Peeled Paint distress ink for the background. It has a brown undertone, which wasn't the look I wanted, but it is growing on me. Used some markers for the centers -- rubbing the markers on an acrylic block and picking up with water and a brush.
Tag is from Avery Elle Thanks a Bunch. Love that tag!!
MOOD WHEN DONE = Dreamy
Pinterest Tip: If you have a blog on blogger and want to make sure that when folks pin your images, you get credit for creating the image, do the following:
After you've inserted your photo in your post, click on it and click on "Properties". Type in your name or blog or whatever attribution you want under "title text" and "alt text." When someone pins your photo, your attribution will automatically appear in Pinterest.
Monday, July 7, 2014
ReDesign on a Dime: Lisa Spangler

I kept Lisa's perfect layout but don't have a tag die (more on that next Sunday...) so used my Silhouette to cut out a tag. I also don't have the Mama Elephant set Lisa used (although would love to get it.) Decided to substitute a solid flower and vamp up the color palette.
Here's how I started. Grabbed my bag of green and red inked sponges. (I store my sponges in zip loc sandwhich bags -- poked some holes in the bags so the air escapes and they store flat. By using sponges, I've avoided buying the Ranger tool for sponging Distress Inks. It looks great but I find cutting up sponges works just fine.)

I placed the stamp next to the tag. Sponged the tag in green and raspberry, aiming for the spots on the tag where I thought the flower would go.

Perfection not needed here. In fact, it would spoil the result.
I added a background from Impression Obsession at the bottom of the tag to form a border and stamped a sentiment from an Altenew set in the same raspberry distress ink.

Flicked some ink with a paint brush on the card, in the same direction that Lisa did -- from top left to bottom right -- to help the eye go in that direction toward the tag and sentiment.
MOOD WHEN DONE = Cheery
Thanks, Lisa. You may not know it but your work certainly inspires me. And I didn't spend a dime doing it.
Sunday, July 6, 2014
Sunday Savings (How to Stamp Without Going Broke)
Decided to share a few ideas and thoughts I've had lately about how to stamp without going broke -- this is something with which I struggle, but have been having some pretty good success lately. I'll continue this on Sundays as long as there is something to say because I suspect my experiences are pretty similar to yours. Would love to hear your reaction.
This week's thought is: We are in charge of what we buy and when we buy it.
It sounds simple, but businesses are built on the opposite concept. Companies want to be in charge of when and how much we spend. Stamping companies know that this is discretionary spending. None of us "needs" that die or ink pad and really, if I don't get one floral set, there are really 20 others that will make me just as happy. That's why they advertise and have sales. And free shipping -- with a minimum purchase. And monthly releases or annual catalogs. And fabulous Design Teams.
So when I saw that Ellen Hutson was having a 20 percent off sale this weekend, I thought about getting a few things. But then I remembered that I wasn't planning on buying a thing this weekend and the things I particularly want right now are not sold by Ellen Hutson. I could have placed an order for $50 worth of product and "saved" $10 or I could have just saved $50.
There's no right answer -- if I had a list of products I was planning on buying soon that EH sells, purchasing them this weekend would have been smart (particularly because Ellen runs a first rate operation).
But I decided not to buy. I didn't let a sale make the decision for me. So now I still have my $50....
Next week I'll share a few techniques on selecting how to spend that money, given the hundreds, if not thousands, of choices. Decisions, decisions.
Wednesday, July 2, 2014
Non Traditional Baby Gift Tag

Have been looking for a baby set for years. I'm just not a fan of rattles and bottles, etc. Finally, I found an Avery Elle set -- Storybook -- that I really love. It can be used for more than babies, which was essential to make the purchase worthy, and is just darling.
Paired with with Lawn Fawn's Harold's ABCs. Such a great alphabet set. Love being able to personalize the gift tag.
Colored the tag with Copics and paper pieced the duck, which hangs off the tag just a bit. Stickles on the butterflies.
MOOD WHEN DONE = Delighted
Tuesday, July 1, 2014
ReDesign on a Dime: Amy Tsuruta

I love Amy! She combines patterns and textures in such interesting ways, and yet her cards are not busy or overloaded. That's hard to pull off. But she does it every day.
Here's Amy gorgeous card that inspired me, along with mine.

I fell in love with the combination of vellum and wood grained card stock, and the cut off circle is very clever. I didn't have any wood grained card stock or stamp or plates, so I wasn't sure how to create that look without spending a dime, until Amy very, very nicely sent me a pack of this card stock in a variety of colors. Unfortunately, the store where Amy bought it has since closed and I have not been able to find this anywhere online.
Since Amy sent me the card stock, I didn't need to do is a lot of ReDesigning. I love my card as well as Amy's and didn't spend a dime. Sweet.
Thank you Amy for the inspiration and the card stock!
MOOD WHEN DONE = Pleased
Subscribe to:
Posts (Atom)